Boa server is a small and efficient web server (only 60kb in size), high efficiency, developed for embedded applications, can support CGI scripts for a variety of resource-limited embedded application environments, is a single-tasking web server, The request for http is executed in sequential execution mode, and does not call fork to create a new process to implement. However, when executing CGI, it adopts a multi-process method, which can be executed separately for the corresponding process of the CGI program fork. This design method greatly ensures that deploying web services on the re-embedded platform will not bring excessive pressure to the platform and excessive resource loss, which will affect the performance of other applications running on the platform, which is very suitable for some embedded applications. demand.

Figure 1 Boa log
Second, preparation work1) Download the Boa source package
The latest Boa source code can be downloaded from the http:// website. The version downloaded during the migration is 0.94.13.
2) Build a development environment
The process of this article is based on the Linux system environment. You need to install the Linux operating system on the DragonBoard 410c. For the specific installation method, refer to the LinuxUserGuide.pdf document of the DragonBoard 410c provided by Qualcomm and set up the network.
3) Install the cross-compilation toolchain on the PC
This article uses arm-linux-gcc 4.4.3, the specific installation method can refer to the following link:
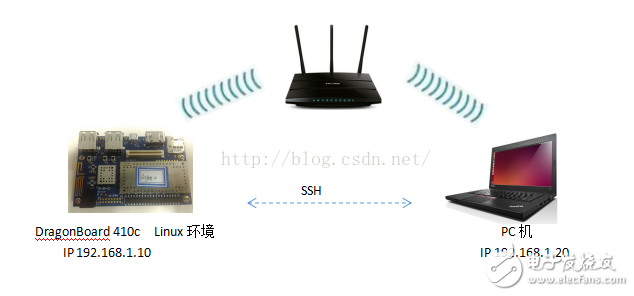
Http://, after the installation is completed, build a cross-compilation environment according to the following figure. After setting up the network, the way of connecting the micro usb to the computer in the figure can be connected by WiFi, and the ssh remote login tool is used to log in to the development board. Just fine.

Figure 2 compilation environment
Third, the transplantation of Boa1) Unzip the Boa package
# tar xzf boa-0.94.13.tar.gz
2) Refer to the information on the Boa website http://, install the bison and flex tools
3) Modify related documents
In the installation process, you need to modify the three files src/compat.h, src/log.c and src/boa.c. The specific modification method is as follows:
// src/compat.h file modification
#gedit src/compat.h
Found: #define TIMEZONE_OFFSET(foo) foo##-》tm_gmtoff
Modify the code to: #define TIMEZONE_OFFSET(foo) (foo)-"tm_gmtoff
//src/log.c file modification
#gedit src/log.c
Find the code snippet:
If (dup2(error_log, STDERR_FILENO) == -1) {
DIE ("unable to dup2 the error log");
}
Comment out the code snippet.
//src/boa.c file modification
Comment out the following two sentences:
If (passwdbuf == NULL) {
DIE("getpwuid");
}
If (initgroups(passwdbuf->pw_name, passwdbuf->pw_gid) == -1) {
DIE("initgroups");
}
with
If (setuid(0) != -1) {
DIE ("icky Linux kernel bug!");
}
4) Generate a Makefile
In the decompressed boa source file, the configure tool is provided to configure the makefile. The specific commands are as follows:
First go to the src directory
Cd boa-0.94.19/src
Then execute ./configure
5) Modify the compilation tool in the makefile, specify the CC=gcc in the generated makefile to use the gcc tool to compile, but our goal is to transplant the Boa to the development board, the development board is based on the ARM architecture. Therefore, you need to modify the compilation tool, that is, modify CC=gcc to:
CC = arm-softfloat-linux-gnu-gcc
At the same time, you need to use the CPP compiler tool in compiling Boa, using gcc-E. Therefore, you need to modify CPP = gcc -E to CC = arm-softfloat-linux-gnu-gcc -E.
6) Compile Boa
Directly execute the #make command to compile. After compiling, you can get the executable boa file. If you need to further compress the boa size, you can execute #arm-softfloat-linux-gnu-strip boa, and you can further execute the generated boa. Slimming.
7) Boa configuration
There is a boa.conf configuration file in the downloaded source directory. In this configuration file, users can modify their web configuration, including Group, user, ScriptAlias, documentRoot, SserverName, AccessLog and other information. For specific modifications, please refer to http:/ The configuration data and methods in / can be modified, you can also open the boa.conf file directly to see the comments to modify.
8) Download to the development board
Create a boa folder in the /etc directory of the development board, then copy the compiled and modified boa and boa.conf to the /etc/boa directory of the development board, and the etc/mime.types file on the PC. Copy it to the /etc directory on the development board.
After completing the above file download, create the www directory in the /etc/boa folder of the 410c development board, and create the cgi-bin directory in the www directory, where the www directory is used to store the web page html file, and the cgi-bin is used to store the cgi script. .
Finally, copy your home page file index.html to the www directory of the development board. If index.html has associated files or folders, copy it all to this directory. At this point, the entire Boa web server is ported, open the browser on the PC, enter the ip of the development board to see the content of the home page.
After completing the construction of the web server, combined with the previous blog "Mobile Image Monitoring System Based on DragonBoard 410c Platform", it is convenient to construct a web-based mobile image detection system and realize mobile image monitoring with moTIon. View monitoring content based on web mode.
If you are not familiar with html during the migration process, you can open a page (such as) through the browser and save it as an html file, then copy or modify one of the html files as index.html, and then you can use this program to do test.
Heat Sink Material,Gold Plated Alloy,Gold Plated Turned Parts,Molybdenum Sheet Metal
Shaanxi Xinlong Metal Electro-mechanical Co., Ltd. , https://www.cnxlalloys.com