When recording your voice or music, using powerful software like REAPER offers several benefits. However, one essential step in this process is to record arm the track. This permits you to choose the desired track you want to record and select the source of the audio or MIDI. Moreover, by recording a track in REAPER, it knows exactly which microphone or instrument to capture the sound from.
This prevents any confusion and guarantees a smooth recording experience. In this step-by-step and informative article, we will explain the process of record arming a track in REAPER.
Table of Contents
What Is Record Arming in REAPER?
Record arming in REAPER is like telling it which tracks to record on. It is essential because, without record arming, REAPER won’t know which input to use for recording audio or MIDI. Moreover, it is a safety feature that prevents you from accidentally recording material on other tracks. While you record arm a track, you eventually prepare it for recording.Â
Once a track is record armed, it will start recording when you press the record button. You can record arm one track or multiple tracks simultaneously, depending on what you want to do.
How to Record Arm a Track in REAPER (Step-By-Step Guide)
Now that you know the basics of record arming in REAPER, let’s learn how to record arm a track. Head to the given steps and record your first ever arm a track:
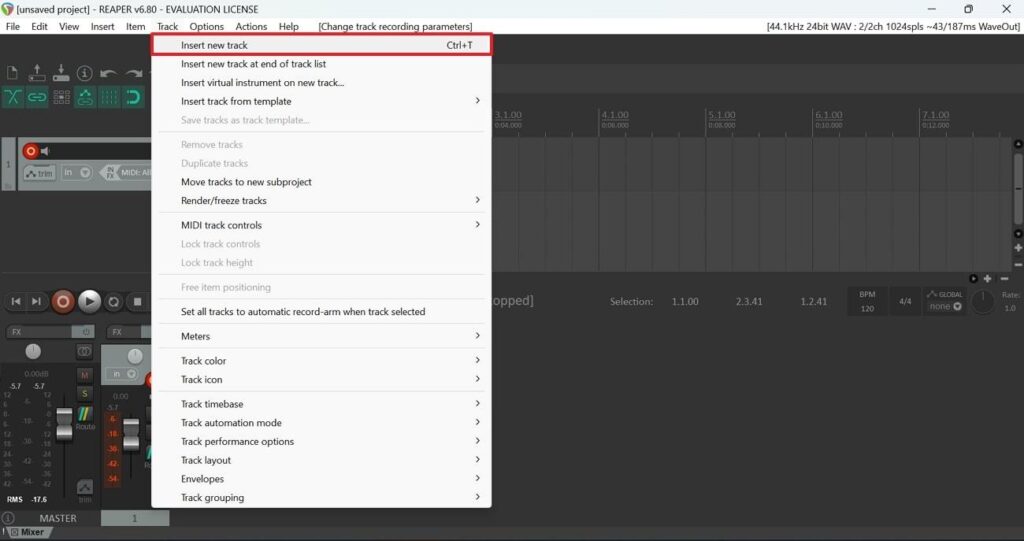
Step 1: At the very first, launch the REAPER app and then select “Track†from the top toolbar. Now, as the drop-down menu appears, click “Insert New Track.†Afterward, locate the “Record Arm†button on that track. It is a circular red button with a white ring inside. Clicking on this button prepares the track for recording.

Step 2: Next, you need to select the input for recording. After clicking the “Record Arm†button, find the “Input†drop-down menu, usually located near the track controls or in the track settings. Open the menu and choose the appropriate input from your audio interface that matches your recording source, such as a microphone or instrument input.

Step 3: After selecting the input, you have to ensure the track is properly armed and monitored is crucial. You can also arm the track by pressing the “F7†key on your keyboard. This action enables the track to be recorded. Additionally, you may need to adjust the monitoring settings to hear the input while recording. Press the “F8†key on your keyboard to access the monitoring settings and make the necessary adjustments.
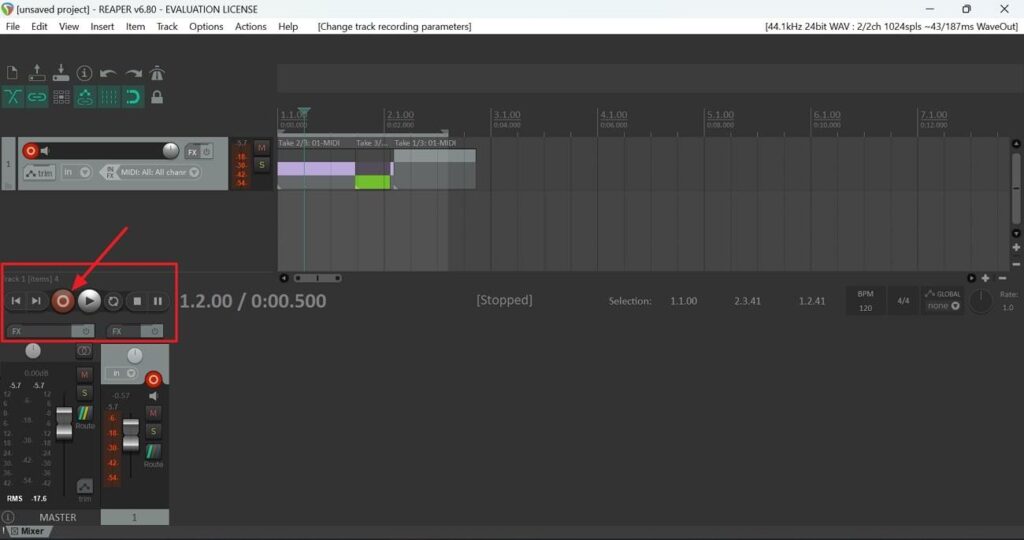
Step 4: Once you have armed the track and set up the monitoring, you can start recording. Locate the transport window in REAPER, typically containing buttons for controlling playback and recording. In the transport window, find the “Record†button and press it to start the recording process. REAPER will begin capturing the sound from the selected track and input source.

Step 5: Remember to save your recording periodically to avoid losing any progress. Following these steps will allow you to successfully record arm a track in REAPER and start capturing your desired audio.
Can I Record Arm Multiple Tracks at Once?
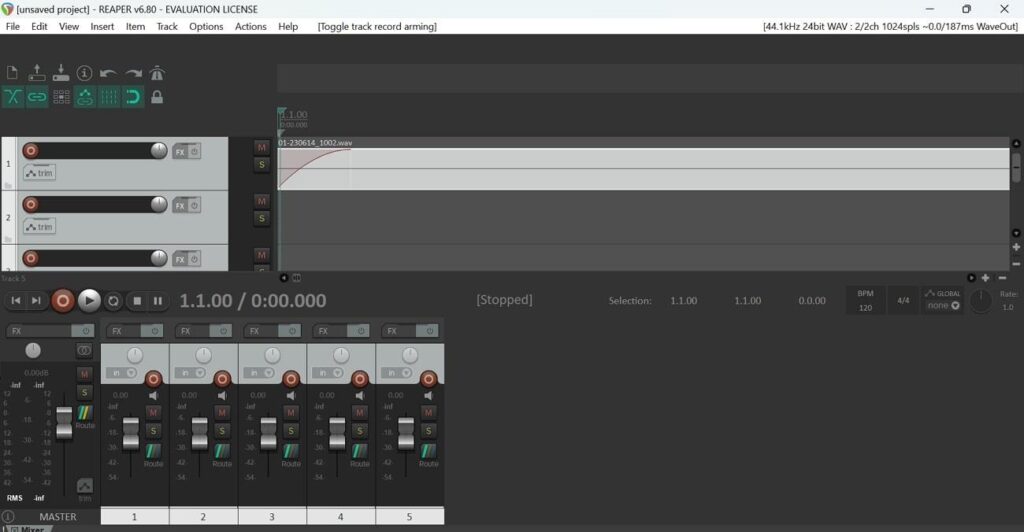
Users are allowed to record multiple tracks at the same time in REAPER. This means you can record different instruments or voices on separate tracks simultaneously. To do this, you must arm the tracks you want to record. Arming a track means getting it ready to record. In REAPER, you can arm multiple tracks together by selecting them all at once.Â
To start, choose the track you want to use by clicking on it. Afterward, hold the “Shift†key when you press it on your keyboard. Finally, click on the last track you want to use. This will highlight all the tracks in between. When you choose the tracks you want to record, you can click the “Record Armed†button on any of those tracks. This will arm all the highlighted tracks for recording.Â
You can start recording on all the armed tracks simultaneously. It’s a simple process allowing you to record as many tracks as you need.

What Does It Mean to Auto Record Arm?
Auto record arm means that when you choose a specific track, it will automatically get ready to record. This can be helpful when switching between different instruments like vocals, acoustic guitar, and MIDI instruments. Instead of manually preparing each track for recording, you only need to select the track, and it will arm itself automatically.Â
To enable the auto-record arm, you can right-click on the record arm button of the corresponding track. A menu will appear. Just toggle the “Automatic record arm when track selected†setting towards the bottom of the list. Once a track is record armed, it will start recording when you press the record button. You can record arm one track or multiple tracks simultaneously, depending on what you want to do.
Frequently Asked Questions
1. How many tracks can REAPER record?
To put it simply, REAPER can record multiple tracks at once without any set maximum limit. The number of tracks you can record depends on factors like your computer’s processor, the amount of storage it has, and the types of tracks you are recording.
2. Is REAPER good for recording instruments?
Exactly, REAPER is a good choice for recording instruments like guitars. However, it may not be easy at first if you’re new to recording. To record your guitar in REAPER, make sure your guitar is working well. Connect your guitar or microphone to a special input on your computer called an audio interface.
3. How many channels can REAPER record at once?
REAPER can record multiple channels. Users can adjust and handle up to 64 audio channels in a single track by default. This allows them to capture many different sounds simultaneously using different tracks.
Final Words
Summing up, record arming a track in REAPER is an essential step to prepare it for recording audio or MIDI. It ensures the software knows which input to use and prevents accidental recording on other tracks. By following the simple steps we have guided you through in this article, you can easily record arm a track in REAPER.Â
Additionally, REAPER allows you to record arm multiple tracks simultaneously. REAPER also allows users to record unlimited channels while using the desired instruments. So, install this tool today on your devices and start recording your favorite tracks.
Linux Pc For Iot,Iot Industrial Computer,Iot Industrial Pc,Linux Industrial Pc
Shenzhen Innovative Cloud Computer Co., Ltd. , https://www.xcycomputer.com